Murasaki Forest: Difference between revisions
m (added The Squeekz to enemy list) |
mNo edit summary |
||
| (One intermediate revision by one other user not shown) | |||
| Line 41: | Line 41: | ||
===Worker mole's shop=== | ===Worker mole's shop=== | ||
{{Shop/head | {{Shop/head | ||
| | |shop=Worker mole's shop | ||
| | |shopkeeper=MoleM3.png | ||
|color=M3 | |color=M3 | ||
}} | }} | ||
{{Shop/cell | {{Shop/cell | ||
| | |name=[[Stick#Better Stick|Better Stick]] | ||
| | |sprite=BetterStick.png | ||
| | |price=500 DP | ||
| | |effect=Weapon for [[Lucas]] | ||
}} | }} | ||
{{Shop/cell | {{Shop/cell | ||
| | |name=[[Gloves#Durable Gloves|Durable Gloves]] | ||
| | |sprite=DurableGloves.png | ||
| | |price=300 DP | ||
| | |effect=Weapon for [[Kumatora]] | ||
}} | }} | ||
{{Shop/cell | {{Shop/cell | ||
| | |name=[[Shoes#Sharp Shoes|Sharp Shoes]] | ||
| | |sprite=SharpShoes.png | ||
| | |price=480 DP | ||
| | |effect=Weapon for [[Duster]] | ||
}} | }} | ||
{{Shop/cell | {{Shop/cell | ||
| | |name=[[Charm#Fly Charm|Fly Charm]] | ||
| | |sprite=FlyCharm.png | ||
| | |price=350 DP | ||
| | |effect=Equipment for everyone | ||
}} | }} | ||
{{Shop/cell | {{Shop/cell | ||
| | |name=[[Bandana#Sparrow Bandana|Sparrow Bandana]] | ||
| | |sprite=SparrowBandana.png | ||
| | |price=200 DP | ||
| | |effect=Equipment for [[Duster]] and [[Salsa]] | ||
}} | }} | ||
{{Shop/cell | {{Shop/cell | ||
| | |name=[[Ribbon#Azure Ribbon|Azure Ribbon]] | ||
| | |sprite=AzureRibbon.png | ||
| | |price=180 DP | ||
| | |effect=Equipment for [[Kumatora]] and [[Boney]] | ||
}} | }} | ||
{{Shop/foot | {{Shop/foot | ||
| | |name=[[Bracelet#Capricorn Bracelet|Capricorn Bracelet]] | ||
| | |sprite=CapricornBracelet.png | ||
| | |price=600 DP | ||
| | |effect=Equipment for [[Flint]], [[Lucas]], [[Duster]], [[Kumatora]], and [[Salsa]] | ||
}} | }} | ||
==Enemies== | ==Enemies== | ||
| Line 99: | Line 99: | ||
==Gallery== | ==Gallery== | ||
<gallery class="m3gallery"> | |||
Murasaki Forest waterfall.png|Caeribe Falls, located in the eastern area of the forest. | |||
UnknownValley.png|Unknown Valley, located behind Caeribe Falls. | |||
Murasaki Forest Ropeway.png|The ropeway to Club Titiboo. | |||
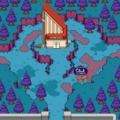
Murasaki Forest Chimera Lab.png|The [[Chimera Laboratory]], located in the western area of the forest. | |||
</gallery> | |||
==Trivia== | ==Trivia== | ||
Latest revision as of 06:06, 24 July 2024
| Murasaki Forest ムラサキのもり Murasaki Forest |
|
|
| Music |
|---|
| Murasaki Forest |
| Connected areas |
| Clayman Factory Club Titiboo Doria's house Chimera Laboratory Unknown Valley Mole Cricket Hole |

The Murasaki Forest is a forest in Mother 3 first accessable during Chapter 4. It is the eastmost of the two major forests found on the Nowhere Islands, the other being Sunshine Forest to the west.
Many of the Pigmask Army's operations take place in the forest, such as the Clayman Factory and Chimera Laboratory. A ropeway leading to Club Titiboo is located here, and to the east is the Mole Cricket Hole, Caeribe Falls and Unknown Valley. The forest is also the location of one of the Seven Needles, which is guarded by Doria.
Overview
Murasaki Forest is accessed from either the railway or the highway. The forest consists of hills and trees with purple colored leaves. A factory where clay used to create Claymen are excavated was built near the railway. The Chimera Lab was built in the westernmost part of the forest. East of it is the ropeway leading Club Titiboo is found, and past that Caeribe Falls. A lake is present between Chimera Lab and Club Titiboo ropeway. North of the lake is a door which can only be opened with the Osohe Dance, past the door is Doria's house where one of the Seven Needles can be found.
The Unknown Valley is located behind Caeribe Falls. There are many holes in the ground here that lead to an underground cavern, all eventually leading to the same exit except for the one furthest southwest, where Duster hid the Egg of Light in a Clayman. The pathway eventually loops around Thunder Tower and reaches the Clayman Factory near the highway.
When first encountered in Chapter 4, the enemies here pose a significant threat to Lucas and Boney due to a significant level advantage and lack of offensive or supporting PSI. By chapter 5, the addition of Duster and Kumatora to the party makes them much more manageable, though they are still more difficult and of higher level than the enemies on the Highway. By Chapter 7, they are entirely beatable with just Lucas and Boney, and are inferior in level to new enemies like the Ten-Yeti and Carefree Jellyfish. Come Chapter 8 and they are vastly overshadowed by enemies like the Rhinocerocket Mark II and Return of Octobot, some of whom have weaker relatives encountered on the Highway.
History
In Chapter 4 Lucas and Boney must visit the forest to visit Club Titiboo and find out about the mystery of the bassist Lucky, who resembles Duster. After working at the Factory in order to earn tickets, they explore the club to find out if Lucky really is Duster. After convincing he is in fact Duster, they set out to find where the Egg of Light was hidden.
In Chapter 5 Lucas's party searches the Unknown Valley in order to find the Egg. Upon reaching the broken Clayman where the egg was hidden, a lightning bolt strikes the Clayman and activates it, forcing the party to chase it to the Clayman Factory in order to obtain the Egg from it.
In Chapter 7 Lucas and Boney visit the Chimera Laboratory to rescue Salsa. After rescuing Salsa from the Chimera Laboratory, Salsa opens the door to Doria's home by using the Osohe Dance. There, they find one of the Seven Needles hidden under a pond. Kumatora and Doria greet them, and Kumatora is revealed to have fallen into one of the ponds after the events of Chapter 5, and Doria, who had found her, allowed her to stay. Unable to access the Needle, Lucas is forced to use one of three specialized chimeras from Dr. Andonuts to remove the pond water. After removing the water, Lucas pulls the Needle, and Doria gives Lucas a Razor and Lipstick in remembrance before disappearing. Upon exiting, Lucas's party is interrupted by The Squeekz, who, after defeated, returns to his wife and seven children at the highway. Afterwords, the Mole Cricket from the Prologue challenges Lucas to a rematch and leads his party to the Mole Cricket Hole.
Items
| Item | Location | |
|---|---|---|
| Eye Drops | West of the Factory between a pile of crates | |
| Fresh Egg | From the chicken near the hot spring west of Chimera Laboratory | |
| Magic Tart | Northwest of the Chimera Laboratory | |
| Saltwater Gun | Along the west wall of the Chimera Laboratory | |
Shops and businesses
Worker mole's shop
| Worker mole's shop | |||
| Item | Price | Effect | |
|---|---|---|---|
| Better Stick | 500 DP | Weapon for Lucas | |
| Durable Gloves | 300 DP | Weapon for Kumatora | |
| Sharp Shoes | 480 DP | Weapon for Duster | |
| Fly Charm | 350 DP | Equipment for everyone | |
| Sparrow Bandana | 200 DP | Equipment for Duster and Salsa | |
| Azure Ribbon | 180 DP | Equipment for Kumatora and Boney | |
| Capricorn Bracelet | 600 DP | Equipment for Flint, Lucas, Duster, Kumatora, and Salsa | |
Enemies
| Sprite | Enemy name | Notes |
|---|---|---|
| Batangutan | None | |
| Reconstructed Mole | None | |
| Pigtunia | None | |
| Cattlesnake | May be very difficult to defeat when first encountered. | |
| Squawking Stick | May drop a Good Stick. | |
| Ostrelephant | May be very difficult to defeat when first encountered. | |
| The Squeekz | Encountered after Doria's needle is pulled. |
Gallery

Caeribe Falls, located in the eastern area of the forest.
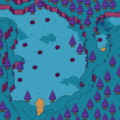
Unknown Valley, located behind Caeribe Falls.
The ropeway to Club Titiboo.

The Chimera Laboratory, located in the western area of the forest.


Trivia
- During Chapter 4, a man can also be seen trying to climb to Club Titiboo because he does not have tickets.
| Locations in Mother 3 |
|---|
| Nowhere Islands
Cities and towns
|