|
There are 169 stubs for enemies. Help out by expanding these pages! Item pages are now going to be split. See WikiBound:Projects for more information. |
|---|
Difference between revisions of "Club Titiboo"
m (Article expansion) |
(→Gallery: updated gallery) |
||
| (15 intermediate revisions by 3 users not shown) | |||
| Line 1: | Line 1: | ||
{{Game icons|M3=y}} | |||
{{Location infobox | {{Location infobox | ||
|color=M3 | |color=M3 | ||
| Line 12: | Line 13: | ||
|music=Ride the Ropeway{{tt|*|Exterior}}<br>Club Titiboo Theme{{tt|*|Lobby and concert hall}}<br>Girl's Room{{tt|*|Violet's room}}<br>The Attic's a Dungeon?!{{tt|*|Attic}}<br>Lucky's Room{{tt|*|Lucky's room}} | |music=Ride the Ropeway{{tt|*|Exterior}}<br>Club Titiboo Theme{{tt|*|Lobby and concert hall}}<br>Girl's Room{{tt|*|Violet's room}}<br>The Attic's a Dungeon?!{{tt|*|Attic}}<br>Lucky's Room{{tt|*|Lucky's room}} | ||
}} | }} | ||
'''Club Titiboo''' is an area in [[Mother 3]], and is where the later events of [[Chapter 4]] occur. Club Titiboo is a concert hall where the workers at the factory hang out after work, the famous band known as the [[DCMC]] perform there. The waitresses at Club Titiboo end their sentences with a giggle, which Kumatora was forced to do while she worked there. | '''Club Titiboo''' is an area in [[Mother 3]], and is where the later events of [[Chapter 4]] occur. Club Titiboo is a concert hall where the workers at the factory hang out after work, the famous band known as the [[DCMC]] perform there. The waitresses at Club Titiboo end their sentences with a giggle, which [[Kumatora]] was forced to do while she worked there. | ||
==Overview== | ==Overview== | ||
The first room is the lobby, where the player can buy [[Club Titiboo#DCMC Merchandise Salesman|DCMC items]] from a salesman, [[List of recovery items in Mother 3#HP|soda]] from a [[Club Titiboo#Vending Machine|vending machine]] and [[ | The first room is the lobby, where the player can buy [[Club Titiboo#DCMC Merchandise Salesman|DCMC items]] from a salesman, [[List of recovery items in Mother 3#HP|soda]] from a [[Club Titiboo#Vending Machine|vending machine]] and [[food]] at a stand. The upper door in the lobby leads to the concert hall, where the DCMC plays. There are also two lateral rooms, consisting of bathrooms to the left, where a [[Save Frog]] can be found, and the band members' rooms to the right. There is an underground passage on the right side, which leads to Kumatora's room. | ||
There is also the attic "dungeon", which is used as a passageway to reach Lucky's room. The attic is a large maze consisting of many room, most leading to "dead ends" made from crates or large pipes. There is a black pipeline which acts as a guide to taking the correct paths, however. The last room is where [[Lucas]] and [[Boney]] fight the [[Jealous Bass]], before arriving at Lucky's room. | ==Attic== | ||
There is also the attic "dungeon", which is used as a passageway to reach Lucky's room. The attic is a large maze consisting of many room, most leading to "dead ends" made from crates or large pipes. There is a black pipeline which acts as a guide to taking the correct paths, however, as well as the correct doorways appearing blue on the in-game map. In the south eastmost room are two elderly mice which will respectivrly give a [[Nut Bread]] and a [[Peculiar Cheese]] when spoken to. The same room has three presents containing "nice things" which will fully heal the party, as well as well as increasing the [[Kindness]] stat. The last room is where [[Lucas]] and [[Boney]] fight the [[Jealous Bass]], before arriving at Lucky's room. After entering Lucky's room, the player can no longer return to the attic. | |||
== | ==History== | ||
During Chapter 4, a band named the [[DCMC]] performs at Club Titiboo. One of its members, named Lucky, closely resembles [[Duster]]. In order to gain access to Club Titiboo, a [[Ropeway]] which accepts tickets must be ridden. These tickets are expensive, however, so many people get jobs at the [[Factory]] to get them. [[Kumatora]] works at Club Titiboo temporarily to gain information on Lucky and his identity, under the identity of Violet, becoming very popular with the men there. [[Lucas]] and [[Boney]] visit the club also to find out more information on the bassist Lucky. The security guards [[Skinhead]] and [[Neckbeard]], however, refuse to let them in as dogs are not allowed, so Lucas puts clothes on Boney as an attempt to disguise him. The security are suspicious and still refuse to let them in, however Kumatora (as Violet) recognizes them and pretends that they are common visitors, and so they are let inside. | |||
During Chapter 4, a band named the [[DCMC]] performs at Club Titiboo. One of its members, named Lucky, closely resembles [[Duster]]. In order to gain access to Club Titiboo, a [[Ropeway]] which accepts tickets must be ridden. These tickets are expensive, however, so many people get jobs at the [[Factory]] to get them. [[Kumatora]] works at Club Titiboo temporarily to gain information on Lucky and his identity, under the identity of Violet, becoming very popular with the men there. [[Lucas]] and [[Boney]] visit the club also to find out more information on the bassist Lucky. The security guards Skinhead and Neckbeard, however, refuse to let them in as dogs are not allowed, so Lucas puts clothes on Boney as an attempt to disguise him. The security are suspicious and still refuse to let them in, however Kumatora (as Violet) recognizes them and pretends that they are common visitors, and so they are let inside. | |||
Lucas and Boney then watch a DCMC performance. During the performance, Lucky's wig pops off hinting that he is Duster. Kumatora then assists Lucas to go to Lucky's room to meet him, and convince him that he is indeed Duster. Due to the security guard blocking the way, Lucas and Boney detour into the attic to reach there. When [[Lucas]] makes it to Lucky's room, Lucky is given the choice to stay with the DCMC or go back to his former identity as Duster, which he leaves up to a game of [[Stone-Sheet-Clippers]]. The DCMC gives Duster a [[Bon Voyage, Amigo|farewell song]] to send him and Lucas's party off, signifying the end of the chapter. | Lucas and Boney then watch a DCMC performance. During the performance, Lucky's wig pops off hinting that he is Duster. Kumatora then assists Lucas to go to Lucky's room to meet him, and convince him that he is indeed Duster. Due to the security guard blocking the way, Lucas and Boney detour into the attic to reach there. When [[Lucas]] makes it to Lucky's room, Lucky is given the choice to stay with the DCMC or go back to his former identity as Duster, which he leaves up to a game of [[Stone-Sheet-Clippers]]. The DCMC gives Duster a [[Bon Voyage, Amigo|farewell song]] to send him and Lucas's party off, signifying the end of the chapter. | ||
| Line 28: | Line 29: | ||
===[[Memo]] {{tt|description|the memo is a beta feature, so certain details may have changed in the final release}}=== | ===[[Memo]] {{tt|description|the memo is a beta feature, so certain details may have changed in the final release}}=== | ||
{{textbox/m3|On the outside, it appears to be an entertainment center for people who work at the factory, but...<br> | |||
...it seems as though it could have quite another side to it.}} | |||
==Shops== | ==Shops== | ||
| Line 56: | Line 41: | ||
}} | }} | ||
{{Shop/foot | {{Shop/foot | ||
|Name=Big City Cola | |Name=[[Big City Cola]] | ||
|Sprite=BigCityCola.png | |Sprite=BigCityCola.png | ||
|Price=10 DP | |Price=10 DP | ||
| Line 69: | Line 54: | ||
}} | }} | ||
{{Shop/cell | {{Shop/cell | ||
|Name=[[ | |Name=[[DCMC Shirt]] | ||
|Sprite=DCMCShirt.png | |Sprite=DCMCShirt.png | ||
|Price=360 DP | |Price=360 DP | ||
| Line 75: | Line 60: | ||
}} | }} | ||
{{Shop/cell | {{Shop/cell | ||
|Name=[[ | |Name=[[DCMC Hat]] | ||
|Sprite=DCMCHat.png | |Sprite=DCMCHat.png | ||
|Price=200 DP | |Price=200 DP | ||
| Line 81: | Line 66: | ||
}} | }} | ||
{{Shop/cell | {{Shop/cell | ||
|Name=[[ | |Name=[[DCMC Ring]] | ||
|Sprite=DCMCRing.png | |Sprite=DCMCRing.png | ||
|Price=200 DP | |Price=200 DP | ||
| Line 87: | Line 72: | ||
}} | }} | ||
{{Shop/foot | {{Shop/foot | ||
|Name=Pickled Veggie Plate | |Name=[[Pickled Veggie Plate]] | ||
|Sprite=PickledVeggiePlate.png | |Sprite=PickledVeggiePlate.png | ||
|Price=10 DP | |Price=10 DP | ||
| Line 99: | Line 84: | ||
}} | }} | ||
{{Shop/cell | {{Shop/cell | ||
|Name= | |Name=[[Big City Soda]] | ||
|Sprite=BigCitySoda.png | |Sprite=BigCitySoda.png | ||
|Price=8 DP | |Price=8 DP | ||
| Line 105: | Line 90: | ||
}} | }} | ||
{{Shop/cell | {{Shop/cell | ||
|Name= | |Name=[[Big City Cola]] | ||
|Sprite=BigCityCola.png | |Sprite=BigCityCola.png | ||
|Price=50 DP | |Price=50 DP | ||
| Line 111: | Line 96: | ||
}} | }} | ||
{{Shop/cell | {{Shop/cell | ||
|Name= | |Name=[[Big City Burger]] | ||
|Sprite=BigCityBurger.png | |Sprite=BigCityBurger.png | ||
|Price=60 DP | |Price=60 DP | ||
| Line 117: | Line 102: | ||
}} | }} | ||
{{Shop/cell | {{Shop/cell | ||
|Name= | |Name=[[Bag of Big City Fries]] | ||
|Sprite=BagOfBigCityFries.png | |Sprite=BagOfBigCityFries.png | ||
|Price=40 DP | |Price=40 DP | ||
| Line 123: | Line 108: | ||
}} | }} | ||
{{Shop/foot | {{Shop/foot | ||
|Name= | |Name=[[Doggy Biscuit]] | ||
|Sprite=DoggyBiscuit.png | |Sprite=DoggyBiscuit.png | ||
|Price=16 DP | |Price=16 DP | ||
| Line 136: | Line 121: | ||
}} | }} | ||
{{Shop/cell | {{Shop/cell | ||
|Name=[[ | |Name=[[Better Stick]] | ||
|Sprite=BetterStick.png | |Sprite=BetterStick.png | ||
|Price=500 DP | |Price=500 DP | ||
| Line 142: | Line 127: | ||
}} | }} | ||
{{Shop/cell | {{Shop/cell | ||
|Name= | |Name=[[Bread Roll]] | ||
|Sprite=BreadRoll.png | |Sprite=BreadRoll.png | ||
|Price=30 DP | |Price=30 DP | ||
| Line 148: | Line 133: | ||
}} | }} | ||
{{Shop/cell | {{Shop/cell | ||
|Name= | |Name=[[Antidote]] | ||
|Sprite=Antidote.png | |Sprite=Antidote.png | ||
|Price=8 DP | |Price=8 DP | ||
| Line 154: | Line 139: | ||
}} | }} | ||
{{Shop/cell | {{Shop/cell | ||
|Name= | |Name=[[Anti-Paralysis]] | ||
|Sprite=Anti-Paralysis.png | |Sprite=Anti-Paralysis.png | ||
|Price=14 DP | |Price=14 DP | ||
| Line 160: | Line 145: | ||
}} | }} | ||
{{Shop/cell | {{Shop/cell | ||
|Name= | |Name=[[Sprinting Bomb]] | ||
|Sprite=Sprintingbomb.png | |Sprite=Sprintingbomb.png | ||
|Price=200 DP | |Price=200 DP | ||
| Line 166: | Line 151: | ||
}} | }} | ||
{{Shop/cell | {{Shop/cell | ||
|Name= | |Name=[[Pencil Rocket]] | ||
|Sprite=PencilRocket.png | |Sprite=PencilRocket.png | ||
|Price=500 DP | |Price=500 DP | ||
| Line 172: | Line 157: | ||
}} | }} | ||
{{Shop/cell | {{Shop/cell | ||
|Name= | |Name=[[Bug Spray]] | ||
|Sprite=BugSpray.png | |Sprite=BugSpray.png | ||
|Price=100 DP | |Price=100 DP | ||
| Line 178: | Line 163: | ||
}} | }} | ||
{{Shop/foot | {{Shop/foot | ||
|Name= | |Name=[[Made-You-Look]] | ||
|Sprite=Made-You-Look.png | |Sprite=Made-You-Look.png | ||
|Price=50 DP | |Price=50 DP | ||
|Effect=Turns an enemy to face the other direction<br>(comparable to the [[Thief Tools|Siren Beetle]]) | |Effect=Turns an enemy to face the other direction<br>(comparable to the [[Thief Tools|Siren Beetle]]) | ||
}} | }} | ||
==Items== | |||
{{OverworldItems|game=M3}} | |||
{{OverworldItems/cell|sprite=[[File:Made-You-Look.png]]|[[Made-You-Look]]|Found in the southernmost area in the underground passageway}} | |||
{{OverworldItems/foot|sprite=[[File:SaltwaterGun.png]]|[[Saltwater Gun]]|Found in the southernmost area in the underground passageway}} | |||
===Attic=== | |||
{{OverworldItems|game=M3}} | |||
{{OverworldItems/cell|sprite=[[File:Map.png]]|[[Map|Attic Guide]]|From the entrance, entering through the doorway to the left where the Item Guy is also found}} | |||
{{OverworldItems/cell|sprite=[[File:Antidote.png]]|[[Antidote]]|From the entrance, entering through the doorway to the right then the doorway straight ahead}} | |||
{{OverworldItems/cell|sprite=[[File:BagOfBigCityFries.png]]|[[Bag of Big City Fries]]|From the northeast most room, by entering the lower doorway to the left}} | |||
{{OverworldItems/cell|sprite=[[File:BugSpray.png]]|[[Bug Spray]]|From the entrance room, by entering the doorway to the right, then near the doorway to the left}} | |||
{{OverworldItems/cell|sprite=[[File:MagicGelatin.png]]|[[Magic Gelatin]]|In the room just before the Jealous Bass}} | |||
{{OverworldItems/cell|sprite=[[File:MagicTart.png]]|[[Magic Tart]]|From the entrance room, by entering the doorway to the right, then the rightmost doorway}} | |||
{{OverworldItems/cell|sprite=[[File:NutBread.png]]|[[Nut Bread]]|In the room with the two mice at the table, from speakig to the moust on the right}} | |||
{{OverworldItems/cell|sprite=[[File:PeculiarCheese.png]]|[[Peculiar Cheese]]|In the room with the two mice at the table, from speakig to the moust on the left}} | |||
{{OverworldItems/foot|sprite=[[File:Sprintingbomb.png]]|[[Sprinting Bomb]]|In the northeast most room}} | |||
==Enemies== | |||
===Underground passageway=== | |||
{{Enemy list|game=M3}} | |||
{{Enemy list/cell|SlimySlugOverworld.png|Slimy Slug}} | |||
|} | |||
===Attic=== | |||
{{Enemy list|game=M3}} | |||
{{Enemy list/cell|GreedierMouseOverworld.png|Greedier Mouse}} | |||
{{Enemy list/cell|Arachnid!!!!Overworld.png|Arachnid!!!!}} | |||
{{Enemy list/cell|ElderBattyOverworld M3.png|Elder Batty}} | |||
{{Enemy list/cell|GentlyWeepingGuitarOverworld.png|Gently Weeping Guitar}} | |||
{{Enemy list/cell|BeatenDrumOverworld.png|Beaten Drum}} | |||
{{Enemy list/cell|JealousBassOverworld.png|Jealous Bass|Boss}} | |||
|} | |||
==Gallery== | ==Gallery== | ||
{{gallery}} | {{gallery|color=locations}} | ||
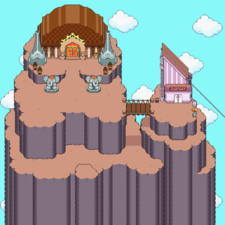
{{gallery/cell|Club Titiboo outside.png|150px|Outside of Club Titiboo.}} | {{gallery/cell|Club Titiboo outside.png|150px|Outside of Club Titiboo.}} | ||
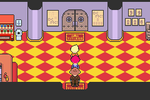
{{gallery/cell|Club Titiboo inside.png|150px|Inside the lobby.}} | {{gallery/cell|Club Titiboo inside.png|150px|Inside the lobby.}} | ||
{{gallery/cell|Club Titiboo stage.png|150px|The stage area, where [[DCMC]] performs.}} | {{gallery/cell|Club Titiboo stage.png|150px|The stage area, where [[DCMC]] performs.}} | ||
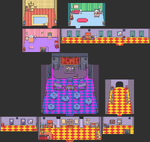
{{gallery/cell|Club titiboo map.png|150px|A map of the interior.}} | |||
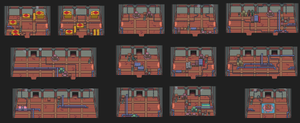
{{gallery/cell|ClubTitibooAttic.png|300px|The attic}} | |||
|} | |} | ||
==Trivia== | ==Trivia== | ||
*After the DCMC's final show, a guitar pick is left on the floor by the stage. | *After the DCMC's final show, a guitar pick is left on the floor by the stage. | ||
{{Mother 3 locations}} | {{Mother 3 locations}} | ||
[[Category:Mother 3 locations]] | |||
Latest revision as of 03:36, 4 December 2023
| Club Titiboo クラブ・チチブー Club Titiboo |
| Connected areas |
|---|
| Ropeway Murasaki Forest |
| Music |
| Ride the Ropeway* Club Titiboo Theme* Girl's Room* The Attic's a Dungeon?!* Lucky's Room* |
Club Titiboo is an area in Mother 3, and is where the later events of Chapter 4 occur. Club Titiboo is a concert hall where the workers at the factory hang out after work, the famous band known as the DCMC perform there. The waitresses at Club Titiboo end their sentences with a giggle, which Kumatora was forced to do while she worked there.
Overview
The first room is the lobby, where the player can buy DCMC items from a salesman, soda from a vending machine and food at a stand. The upper door in the lobby leads to the concert hall, where the DCMC plays. There are also two lateral rooms, consisting of bathrooms to the left, where a Save Frog can be found, and the band members' rooms to the right. There is an underground passage on the right side, which leads to Kumatora's room.
Attic
There is also the attic "dungeon", which is used as a passageway to reach Lucky's room. The attic is a large maze consisting of many room, most leading to "dead ends" made from crates or large pipes. There is a black pipeline which acts as a guide to taking the correct paths, however, as well as the correct doorways appearing blue on the in-game map. In the south eastmost room are two elderly mice which will respectivrly give a Nut Bread and a Peculiar Cheese when spoken to. The same room has three presents containing "nice things" which will fully heal the party, as well as well as increasing the Kindness stat. The last room is where Lucas and Boney fight the Jealous Bass, before arriving at Lucky's room. After entering Lucky's room, the player can no longer return to the attic.
History
During Chapter 4, a band named the DCMC performs at Club Titiboo. One of its members, named Lucky, closely resembles Duster. In order to gain access to Club Titiboo, a Ropeway which accepts tickets must be ridden. These tickets are expensive, however, so many people get jobs at the Factory to get them. Kumatora works at Club Titiboo temporarily to gain information on Lucky and his identity, under the identity of Violet, becoming very popular with the men there. Lucas and Boney visit the club also to find out more information on the bassist Lucky. The security guards Skinhead and Neckbeard, however, refuse to let them in as dogs are not allowed, so Lucas puts clothes on Boney as an attempt to disguise him. The security are suspicious and still refuse to let them in, however Kumatora (as Violet) recognizes them and pretends that they are common visitors, and so they are let inside.
Lucas and Boney then watch a DCMC performance. During the performance, Lucky's wig pops off hinting that he is Duster. Kumatora then assists Lucas to go to Lucky's room to meet him, and convince him that he is indeed Duster. Due to the security guard blocking the way, Lucas and Boney detour into the attic to reach there. When Lucas makes it to Lucky's room, Lucky is given the choice to stay with the DCMC or go back to his former identity as Duster, which he leaves up to a game of Stone-Sheet-Clippers. The DCMC gives Duster a farewell song to send him and Lucas's party off, signifying the end of the chapter.
During Chapter 5, the DCMC no longer perform there due to Duster leaving, and Club Titiboo is shut down in Chapter 7, left completely deserted.
Memo description
|
Shops
| This article needs correct shop table data. The shop data requested is: "sprites" You can discuss this issue on the talk page or edit this page to improve it. |
Vending machine
| Vending machine | |||
| Item | Price | Effect | |
|---|---|---|---|
| Big City Cola | 10 DP | Restores 30 HP | |
DCMC Merchandise Salesman
| DCMC Merchandise Salesman | |||
| Item | Price | Effect | |
|---|---|---|---|
| DCMC Shirt | 360 DP | Equipment for Lucas, Duster, and Kumatora | |
| DCMC Hat | 200 DP | Equipment for Lucas and Boney | |
| DCMC Ring | 200 DP | Equipment for Lucas, Duster, and Kumatora | |
| Pickled Veggie Plate | 10 DP | Restores 10 HP | |
Food stand
| Food stand | |||
| Item | Price | Effect | |
|---|---|---|---|
| Big City Soda | 8 DP | Restores 20 HP | |
| Big City Cola | 50 DP | Restores 30 HP | |
| Big City Burger | 60 DP | Restores 100 HP | |
| Bag of Big City Fries | 40 DP | Restores 70 HP | |
| Doggy Biscuit | 16 DP | Restores 60 HP* or 6 HP* | |
Mouse
| Mouse | |||
| Item | Price | Effect | |
|---|---|---|---|
| Better Stick | 500 DP | Weapon for Lucas | |
| Bread Roll | 30 DP | Restores 60 HP | |
| Antidote | 8 DP | Recovers from poison | |
| Anti-Paralysis | 14 DP | Recovers from numbness | |
| Sprinting Bomb | 200 DP | Bomb element damage to all enemies | |
| Pencil Rocket | 500 DP | Bomb element damage to all enemies | |
| Bug Spray | 100 DP | Kills a single insect enemy instantly | |
| Made-You-Look | 50 DP | Turns an enemy to face the other direction (comparable to the Siren Beetle) | |
Items
| Item | Location | |
|---|---|---|
| Made-You-Look | Found in the southernmost area in the underground passageway | |
| Saltwater Gun | Found in the southernmost area in the underground passageway | |
Attic
| Item | Location | |
|---|---|---|
| Attic Guide | From the entrance, entering through the doorway to the left where the Item Guy is also found | |
| Antidote | From the entrance, entering through the doorway to the right then the doorway straight ahead | |
| Bag of Big City Fries | From the northeast most room, by entering the lower doorway to the left | |
| Bug Spray | From the entrance room, by entering the doorway to the right, then near the doorway to the left | |
| Magic Gelatin | In the room just before the Jealous Bass | |
| Magic Tart | From the entrance room, by entering the doorway to the right, then the rightmost doorway | |
| Nut Bread | In the room with the two mice at the table, from speakig to the moust on the right | |
| Peculiar Cheese | In the room with the two mice at the table, from speakig to the moust on the left | |
| Sprinting Bomb | In the northeast most room | |
Enemies
Underground passageway
| Sprite | Enemy name | Notes |
|---|---|---|
| Slimy Slug | None |
Attic
| Sprite | Enemy name | Notes |
|---|---|---|
| Greedier Mouse | None | |
| Arachnid!!!! | None | |
| Elder Batty | None | |
| Gently Weeping Guitar | None | |
| Beaten Drum | None | |
| Jealous Bass | Boss |
Gallery
| Gallery | ||||||||||||||
|
|
|
|
| ||||||||||
Trivia
- After the DCMC's final show, a guitar pick is left on the floor by the stage.
| Locations in Mother 3 |
|---|
| Nowhere Islands
Cities and towns
|


